Creating Applications With JavaFX
It’s been a while since my last post, but it’s summer now so I’ll have time to work on some projects which I will write about in the coming weeks. Last time I mentioned using JavaFX to create the GUI for a project. In this post I will give my attempt at a JavaFX crash course as well as talk about my experiences with it so far.
JavaFX
JavaFX is a GUI library for Java which is intended to replace Swing. As of Java 7 update 6 JavaFX is bundled with the JRE. However, it was left in a weird state of being included but not part of the default classpath. As of Java 8, this should be fixed and it should work “out of the box.”
There are two main ways that you can use JavaFX to create your applications. First, you can do it programmatically, much like you would do with Swing. That is, you write code to define different components, their properties, their location, etc. The second option is to use FXML, which is an XML-based markup language, to define the interface. This is similar to using HTML to define a web page. Much like with HTML, you can use CSS to style the application. This approach allows a much clearer separation of the user interface design and the back-end logic.
Another option instead of doing all of that manually, is to use the JavaFX Scene Builder, which is visual layout tool that will output FXML for you. The end result is, presumably, the same or similar to writing FXML on your own. I personally stayed away from it since my interface would be fairly simple and so that I would have a better understanding of what was going on.
Getting Started with JavaFX
Setting up Your Development Environment
As I mentioned earlier, in Java 7 (which I am using), JavaFX is included with the JRE but not in the default classpath. This means that if you try to compile or run a JavaFX application without some initial setup, you’ll probably get some kind of class not found errors. To fix this, you will either need to add the JavaFX JAR as a library or dependency to whatever IDE and/or build tool you are using. Or you can muck around with your JDK installation a bit. Since I was using Maven to build my project, I ended up using a JavaFX Maven Plugin which has a command to help fix the classpath. If you would prefer not to do that you can find the necessary JAR file at JAVA_HOME/jre/lib/jfxrt.jar. So, for example, with Eclipse you can go to Project > Properties > Java Build Path > Libraries > Add External JARs then select the JAR file that I mentioned.
JavaFX Basics
If you want more in depth tutorials and guides on JavaFX, you would probably be better off skipping this post and starting here. However, if you want just enough to get started, I will do my best to distill most of the important information.
First you should know the basic structure of a JavaFX application. At the highest level there is a Stage, which is basically equivalent to the window. Within the stage, you have a Scene which will contain all of the components. The content is defined by a hierarchical graph of nodes known as a scene graph. Each node might be a single UI element such as a button or a label, or it might be something like a layout pane which will contain a number of children. At the top of the hierarchy should be a single root node.
Below is a very simple example of how to launch a JavaFX application. One slight variation that may be of interest is manually setting the dimensions in the Scene constructor.
import javafx.application.Application;
import javafx.scene.Parent;
import javafx.scene.Scene;
import javafx.stage.Stage;

public class Main extends Application {
    @Override
    public void start(Stage stage) {
        // createRoot() could be any number of things.
        // it might create a panel with a single button
        // or it might create an entire complex scene graph
        Parent root = createRoot();
        Scene scene = new Scene(root);

        stage.setTitle("Example");
        stage.setScene(scene);
        stage.show();
    }

    public static void main(String[] args) {
        launch(args);
    }
}
Programmatic JavaFX
Here is a simple example of how to use JavaFX to programmatically create a simple GUI.
import javafx.scene.control.Label;
import javafx.scene.control.TextField;
import javafx.scene.layout.HBox;

public class ExamplePanel extends HBox {
    public ExamplePanel() {
        Label label = new Label("Label");
        TextField textField = new TextField("Text Field");

        this.getChildren().add(label);
        this.getChildren().add(textField);
    }
}
We then need to update our Main class.
Parent root = new ExamplePanel();
Running this program will give us a simple application.
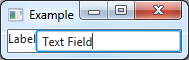
Let’s start from the top and briefly explain what is going on. HBox is a layout pane that places children horizontally in a single row, which is why the components are laid out side by side. Label and TextField are two examples of components known as Controls, which are elements that can be manipulated by the user. Some other examples include Sliders and Buttons.
The last two lines are probably the most interesting. The getChildren method is inherited from the Parent class (which HBox is a child of) which is simply a node that can have children. The method in question will return a list of nodes that you can add to or remove from.
Handling Events
That was simple enough, but it obviously doesn’t do much. In order to make things a little more interesting, we’ll add a Button as well as some code to react to button presses.
import javafx.event.ActionEvent;
import javafx.event.EventHandler;
import javafx.scene.control.Button;
// additional imports omitted

public class ExamplePanel extends HBox {
    public ExamplePanel() {
        // must be final so that it can be used in the anonymous inner class
        final Label label = new Label("Label");
        TextField textField = new TextField("Text Field");
        Button button = new Button("Button");

        button.setOnAction(new EventHandler<ActionEvent>() {
            @Override public void handle(ActionEvent e) {
                label.setText("Clicked");
            }
        });

        this.getChildren().add(label);
        this.getChildren().add(textField);
        this.getChildren().add(button);
    }
}
Here’s what our application now looks like before and after clicking the button.


In this example we change the text of the label when the button is clicked. To do this we call the setOnAction method of our button which expects an EventHandler. We could create a separate class; maybe something like class MyButtonHandler implements EventHandler. However, it would quickly become cumbersome to create a new class for each button we might have, especially when it will only be used once. For situations like this, Java provides anonymous inner classes. It is called anonymous because it has no name and it is called inner because it is defined inside of another class.
To create an anonymous inner class you start with new ClassName() as if you were calling a constructor, but instead of ending there, you continue by actually defining the body of the class. In our example we are creating an EventHandler which is an interface defining a single method which we must override. In the body of the method we write code that will be executed whenever the button is clicked. Since our example is simple, it might make sense to just define the behavior in the handle method. However, if we have more complex behavior we might write that code in a separate method and simply call that method from the handle method (which I will demonstrate in the next example).
Other than just reacting to button presses, you may also want to react to a change in some property. In my example, I will use a Slider. To do that, I will refactor the code a little to make adjustments to the layout as well as make things a little more extensible and maintainable.
import javafx.beans.value.ChangeListener;
import javafx.beans.value.ObservableValue;
import javafx.scene.control.Slider;
import javafx.scene.layout.VBox;
// additional imports omitted

public class ExamplePanel extends VBox {
    private Label label;
    private TextField textField;
    private Button button;

    private Slider slider;

    public ExamplePanel() {
        this.label = new Label("Label");
        this.textField = new TextField("Text Field");
        this.button = new Button("Button");

        this.slider = new Slider();

        this.button.setOnAction(new EventHandler<ActionEvent>() {
            @Override public void handle(ActionEvent e) {
                handleButtonClick();
            }
        });

        this.slider.valueProperty().addListener(new ChangeListener<Number>() {
            @Override public void changed(ObservableValue<? extends Number> observable,
                                Number oldValue, Number newValue) {
                handleSliderChange();
            }
        });

        HBox topRow = new HBox();
        topRow.getChildren().add(label);
        topRow.getChildren().add(textField);
        topRow.getChildren().add(button);

        this.getChildren().add(topRow);
        this.getChildren().add(slider);
    }

    private void handleButtonClick() {
        this.label.setText("Clicked");
    }

    private void handleSliderChange() {
        this.label.setText(String.valueOf(this.slider.getValue()));
    }
}
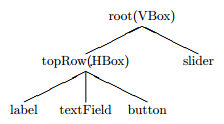
The updated application will not look like this.

The first thing to notice is that I am now extending VBox instead of HBox. As you might expect, VBox lays out components vertically in a single column. Another thing to note is that I’ve created a VBox local variable and added our original components to that, and then added that to the ExamplePanel. This is one way that we can have multiple elements in a single row even though a VBox lays out everything in a single column. Since our layout is getting a little more complex, it might help to see the scene graph.
You’ve probably also noticed that I’ve made the components instance variables instead of local variables. That is so that they can be accessed in other methods where I demonstrate the approach of calling a single method from inside the event handler.
Of course, the last and most important change was the addition of the Slider. Handling a Slider change is slightly different than handling a button press. Instead of just telling it what to do when something happens (i.e. setOnAction), we must get a property (which I will attempt to briefly describe later) from the Slider and add a listener to it. As with the EventHandler, the listener will be an anonymous inner class.
I believe this approach can be used to listen to other properties of other components such as the text of a TextField. However, I’ve only used it with a Slider.
JavaFX with FXML
Next I will explain how we can make the same layout using FXML. First we need an FXML file, which might look like this:
<?xml version="1.0" encoding="UTF-8"?>

<?import javafx.scene.control.*?>
<?import javafx.scene.layout.*?>

<VBox xmlns:fx="http://javafx.com/fxml">
  <HBox>
    <Label text="Label" />
    <TextField text="Text Field"/>
    <Button text="Button"/>
  </HBox>
  <Slider />
</VBox>
Then we need to update our Main class again.
Parent root = FXMLLoader.load(getClass().getResource("example_panel.fxml"));
You must be sure that your FXML file is in the same directory as your compiled class files, or you need to specify the full path to the layout file.
At this point our application won’t do anything because it no longer has any code to react to actions or changes. In order to do that we must make some modification to our FXML file.
<!-- content omitted -->

<VBox xmlns:fx="http://javafx.com/fxml"
    fx:controller="ExampleController">
  <HBox>
    <Label fx:id="label"
        text="Username: " />
    <TextField fx:id="textField" />
    <Button fx:id="button"
        text="Login"
        onAction="# handleButtonClick" />
  </HBox>
  <Slider fx:id="slider"
      onValueChange="# handleSliderChange" />
</VBox>
And add this class.
import javafx.fxml.FXML;

public class ExampleController {
    @FXML private Label label;
    @FXML private TextField textField;
    @FXML private Button button;

    @FXML private Slider slider;

    @FXML
    private void handleButtonClick() {
        this.label.setText("Clicked");
    }

    @FXML
    private void handleSliderChange() {
        this.label.setText(String.valueOf(this.slider.getValue()));
    }
}
In our FXML file we specify a controller and give our components IDs. In our controller class, we create the same instance variables as before, except this time we add the @FXML annotation, which signifies that they are accessible to FXML files. You must ensure that their names exactly match the ID specified in the FXML file. We also added onAction and onValueChange properties to our Button and Slider, respectively. These properties specify which method will be called when an action or value change occurs.
Custom Controls
If we want to create something that can be reused, we can turn it into a custom control by making a few small changes. First we should rename the files to reflect the changes. Then we can go about making the changes.
<!-- content omitted -->
<fx:root xmlns:fx="http://javafx.com/fxml"
    type="javafx.scene.layout.VBox">
  <!-- instead of using VBox as the top level tag
       we use fx:root with a type attribute of VBox -->
  <!-- content omitted -->
</fx:root>
import java.io.IOException;
import javafx.fxml.FXMLLoader;
import javafx.scene.layout.VBox;

public class ExampleControl extends VBox {
    // instance variables omitted

    public ExampleControl() {
        FXMLLoader fxmlLoader = new FXMLLoader(getClass().getResource("example_control.fxml"));
        fxmlLoader.setRoot(this);
        fxmlLoader.setController(this);

        try {
            fxmlLoader.load();
        } catch (IOException exception) {
            throw new RuntimeException(exception);
        }
    }

    // methods omitted
}
And of course we need to update our Main class once again.
Parent root = new ExampleControl();
First, in our FXML file we change the top level tag to be a fx:root instead of a VBox. Then we change what was our controller to load the FXML file in the constructor. The other methods to handle events remain the same.
Finishing Touches
JavaFX Application Thread
In order to (thread-)safely update your UI, you should do so on the JavaFX Application thread. I believe this applies only to components that are in the scene graph. So from my understanding that means it is safe to modify components before you create the Scene. However, once you’ve created the Scene you should run the code on the JavaFX Application thread. Once again anonymous inner classes come to the rescue. Below is an example of how you might use the JavaFX Application Thread.
javafx.application.Platform.runLater(new Runnable() {
    @Override public void run() {
        // some kind of update to the UI
    }
});
So in the previous examples, we should have done something like this:
    @FXML
    private void handleSliderChange() {
        javafx.application.Platform.runLater(new Runnable() {
            @Override public void run() {
                this.label.setText(String.valueOf(this.slider.getValue()));
            }
        });
    }
Creating and Setting Properties
If you want to fine tune the behavior and appearance of your application, you will need to understand properties. First, I’ll start with an example of setting properties of built in components. It’s pretty self explanatory so I will just leave you with an example using a Slider with both the programmatic and the FXML approach.
First the result.

And then the code to produce it using both approaches.
this.slider = new Slider();
this.slider.setMin(0.0);
this.slider.setMax(10.0);
this.slider.setMajorTickUnit(1.0);
this.slider.setMinorTickCount(1);
this.slider.setShowTickMarks(true);
this.slider.setSnapToTicks(true);
<Slider fx:id="slider"
    min="0.0" max="10.0"
    majorTickUnit="1.0" minorTickCount="1"
    showTickMarks="true"
    snapToTicks="true"
    onValueChange="# handleSliderChange" />
Some properties might take an object instead of a simple number or boolean. For example, we might want set the padding property which expects an Insets object. Again, I will leave you with an example.

import javafx.geometry.Insets
// imports and instance variables omitted
    public ExamplePanel() {
      this.setPadding(new Insets(10, 10, 10, 10));
      // content omitted
    }
<?import javafx.geometry.*?>

<fx:root xmlns:fx="http://javafx.com/fxml"
    type="javafx.scene.layout.VBox">
  <padding><Insets top="10" bottom="10" left="10" right="10" /></padding>
  <!-- content omitted -->
</fx:root>
The programmatic approach probably looks like what you would expect. However, the FXML version is a little different than before. This time instead of just saying property="value" we have the property name as a tag and the value goes inside that tag. In this case, the value is a new Insets which we create similarly to how we create other components.
You can also create properties for your own components. I’m still a little fuzzy on this topic so you might be better off checking out the official documentation. However, I will give you a simple example. Below is the code to create an integer property representing the number of times the button was clicked in our custom control.
// imports and instance variables omitted
    private IntegerProperty timesClicked;

// constructor and methods omitted

    @FXML
    private void handleButtonClick() {
        usernameLabel.setText("Clicked");
        setTimesClicked(getTimesClicked() + 1);
    }

    public IntegerProperty timesClickedProperty() {
        if (timesClicked == null) {
            timesClicked = new SimpleIntegerProperty(0);
        }

        return timesClicked;
    }

    public final int getTimesClicked() {
        return timesClickedProperty().get();
    }

    public final void setTimesClicked(int clicks) {
        timesClickedProperty().set(clicks);
    }
If you follow the correct naming convention, which I hope if fairly obvious from my example, you should be able to use that property the same way you would with the Slider properties that I showed above. Using a similar approach you can also create properties for other types, including objects.
Layouts
Besides HBox and VBox there are many other ways to lay out the components of your application. The two that I’ve had the most experience with are BorderPane and GridPane. The BorderPane gives you a top, bottom, left, right, and center region where you can place your components. One of its uses is for designs with a menu and status bar at the top and bottom and with side panels, such as a navigation panel or perhaps just additional information. However, it can also be used as a simple way to have your components layed out in a certain way, relative to each other. The GridPane, as you might expect, is used to layout components on a grid. It is very useful if you want your components to line up in a specific way.
I’ve used all of the layouts mentioned throughout this post in the GUI shown in the next section, however there are also several other layouts, which I have very little or no experience with. If you’re interested in those, this might be a good place to start.
ConnectN with JavaFX
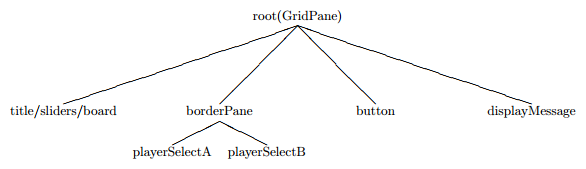
Below is an example of what I managed to create with JavaFX. I originally did it programmatically, but eventually updated it to use custom controls with FXML.

Most of that was accomplished with the concepts described in this post. Of course it involves a lot more handling of events, setting of properties, and of course a more complicated scene graph. Here is the scene graph for the main interface.
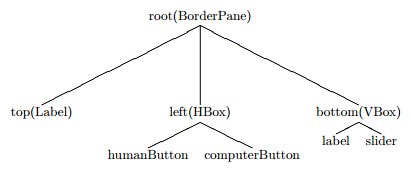
This main panel also consists of two instances of a custom control (the controls to select the players), whose scene graph looks like this.
If you’re interested, you can find the source code here on GitHub. The GUI code can be found in the core/src/main/java/ttaoame/connectn/gui directory and the FXML layouts can be found in core/src/main/resources/layout. If you’re interested in how to define the interfaces programatically, here is the last commit before I began updating the code to use FXML. The code can be found in src/main/java/ttaomae/connectn/gui. I make no guarantees about the quality of my code and I have no idea if it is idiomatic of JavaFX.
Reflection - JavaFX Versus Swing
I would highly recommend that anyone who has used or is planning to use Swing try JavaFX instead. Personally, I think the default look of JavaFX is at least marginally better than that of Swing. However, JavaFX gains a strong advantage when you consider that you can style your app using CSS. I haven’t used CSS so I won’t talk about it here, but if you’re interested you can check out this tutorial. I also found the JavaFX API to be more consistent and easier to use than Swing, however that may partially be attributed to the fact that I have had more experience writing GUI code compared to when I first used Swing. The only advantage of Swing over JavaFX that I can think of is that the documentation and support is probably better since it has been around for much longer. However, with the full integration of JavaFX into Java 8, hopefully that will start to change.