Creating a Chat Application with Sockets
Several months ago I found myself with some free time and decided to experiment with some simple network programming. I created a simple chat program in Java using sockets. This post will describe my first experience with sockets and perhaps even serve as simple tutorial for using sockets in Java.
Sockets
A network socket is “one endpoint of a two-way communication link between two programs running on the network.” In simpler terms, it basically means that sockets allows two programs to communicate. Each communication link will consist of a pair of sockets, which are each identified by an IP address and a port number.
Sockets are commonly used in client-server models. In a client-server model, the client initiates a request to a server, which provides some kind of service to one or more clients. In a chat application, the server would provide the means for sending messages between clients. A client would connect and send messages to the server. The server is then responsible for relaying that message to the other clients.
Sockets in Java
In typical Java fashion, the API provides a convenient abstraction of sockets which allow you to write platform independent code. I found the tutorial by Oracle to be a good place to start learning exactly how to write that code.
The two main operations on a socket are to read from or write to the socket. To accomplish this, Java exposes an input and output stream that you can read from or write to using whatever abstraction you are familiar with. Below is an example of a client which uses a BufferedReader and PrintWriter with a socket. The example is largely based on the above tutorial but simplified a little and commented. Hopefully it is pretty self explanatory. ( If you’re not familiar with the try-with-resources statement, which was added in Java 7, you can read here. Basically it’s a shortcut so you don’t have to close resources in a finally block.)
public class ClientExample {
    public static void main(String[] args) {
        try (
            // create a socket to localhost on port 4200
            Socket mySocket = new Socket("localhost", 4200);
            // create a BufferedReader that can read from the socket
            BufferedReader socketIn = new BufferedReader(new InputStreamReader(mySocket.getInputStream()));
            // create a PrintWriter that can write to the socket
            PrintWriter socketOut = new PrintWriter(mySocket.getOutputStream(), true);
        ) {
            // write to the socket
            socketOut.println("message to socket");
            // read from the socket and print it out
            System.out.println(socketIn.readLine());
        } catch (UnknownHostException e) {
            System.err.println("Unknown host");
        } catch (IOException e) {
            System.err.println("I/O error on socket");
        }
    }
}
If you add the appropriate imports it should compile and run, but it will throw and catch the IOException when it tries to create the socket.
Since a socket is part of a two-way communication link, we need to define the other end of the link. To do that, we use a ServerSocket, which waits for and accepts connection requests. The code below is a simple server, which is again a simplified version of code provided with the sockets tutorial by Oracle, that demonstrates basic usage of a ServerSocket.
public class ServerExample {
    public static void main(String[] args) {
        try (
            // create a new ServerSocket which listens on port 4200
            ServerSocket serverSocket = new ServerSocket(4200);
            // waits for then accepts a connection; returns a socket on that connection
            Socket clientSocket = serverSocket.accept();
            // create a BufferedReader that can read from the socket
            BufferedReader socketIn = new BufferedReader(new InputStreamReader(clientSocket.getInputStream()));
            // create a PrintWriter that can write to the socket
            PrintWriter socketOut = new PrintWriter(clientSocket.getOutputStream(), true);
        ) {
            // reads from the socket then sends that message back
            socketOut.println(socketIn.readLine());
        } catch (IOException e) {
            System.out.println("Error trying to listen on port or listening for a connection");
        }
    }
}
If you run the above code, it won’t do much. It will just wait until it receives a request for a connection. However, if you let it run then also run the client example, it will print out something. Notice that the only print statement in the client is to print whatever it reads from the socket. So what did it read from the socket? It happens to be the same thing that it sent to the socket. Why is that? Take a look at what the server does. It reads a message from the socket then sends it right back.
Creating a Chat Application
So we’ve seen the very basics of creating a client and server using sockets. How can we extend it to create a chat application? Well the first thing we need to do is handle multiple clients. A chat application is not much use if a user can only chat with himself.
Handling Multiple Clients
Below is a minimal example of a server which can handle multiple clients. It will accept two connections then read one line from each socket and send back the message to the opposite socket.
public class SimpleMultiServerExample {
    public static void main(String[] args) {
        try (
            // create a new ServerSocket which listens on port 4200
            ServerSocket serverSocket = new ServerSocket(4200);
            // wait for and accept two connections
            Socket clientSocket1 = serverSocket.accept();
            Socket clientSocket2 = serverSocket.accept();
            // create reader/writer for first socket
            BufferedReader socketIn1 = new BufferedReader(new InputStreamReader(clientSocket1.getInputStream()));
            PrintWriter socketOut1 = new PrintWriter(clientSocket1.getOutputStream(), true);
            // create reader/writer for second socket
            BufferedReader socketIn2 = new BufferedReader(new InputStreamReader(clientSocket2.getInputStream()));
            PrintWriter socketOut2 = new PrintWriter(clientSocket2.getOutputStream(), true);
        ) {
            // reads from each socket then writes back each message to the other socket
            String message1 = socketIn1.readLine();
            String message2 = socketIn2.readLine();
            socketOut1.println(message2);
            socketOut2.println(message1);
        } catch (IOException e) {
            System.out.println("Error trying to listen on port or listening for a connection");
        }
    }
}
In order to see the new server in action, you should create two copies of the client which each send different messages. As before, start the server first then run the two clients. The first client will receive the message from the second client and the second client will receive the message from the first client.
So now we can handle two clients, but what if we want more? What if we don’t know how many clients we will have? We could put the call to accept() in a loop, but now we’re just stuck waiting for connections and we can never do anything with them. In order to handle an unknown amount of clients and actually do something with them, we will use threads. We will still have a server that accepts connections, but we will also create a separate thread to handle each connection. To do this we will create a class that implements Runnable (or extends Thread) that will actually work with the socket. Below is an example of how to accomplish this.
public class BetterMultiServerExample {
    public static void main(String[] args) {
        try (
            // create a new ServerSocket which listens on port 4200
            ServerSocket serverSocket = new ServerSocket(4200);
        ) {
            // accept connections forever
            while (true) {
                Socket socket = serverSocket.accept();
                new Thread(new ClientHandlerExample(socket)).start();
            }
        }
    }
}
public class ClientHandlerExample implements Runnable {
    private Socket socket;

    public ClientHandlerExample(Socket socket)
    {
        this.socket = socket;
    }

    public void run()
    {
        // do stuff with this.socket
    }
}
Now that we have the skeleton for a basic server (of course, the server I created is a little more complex), we can talk about the client a little more. The client basically just sends messages to the socket then displays messages that it receives from the socket.
Input and Output from the Client
I made several attempts at creating a simple chat client. My first attempts were to do everything from the console. I tried both a synchronous and an asynchronous approach. In the synchronous approach, I would read a line of input from the user and send that to the server, then I would read everything that the server has sent so far and print it out. The asynchronous approach used a separate thread to constantly read from the socket and immediately print out whatever it receives.
Both these approaches have some obvious limitations. With the synchronous approach, you will not receive any messages until you send a message of your own. With the asynchronous approach, since there is only one display for both input and output, the display can easily become messy if a message is sent while the user is typing something.
I quickly realized that in order to be more usable, I would need to have separate displays for input and output. I decided to use Swing to create a simple panel to output messages from the server and to continue using the console for input. This worked fine and at this point I basically had a simple chat client and server working. However, the interface was very disconnected and running multiple clients for testing required opening multiple terminals. In the end I decided to create a simple GUI in Swing to deal with both input and output.
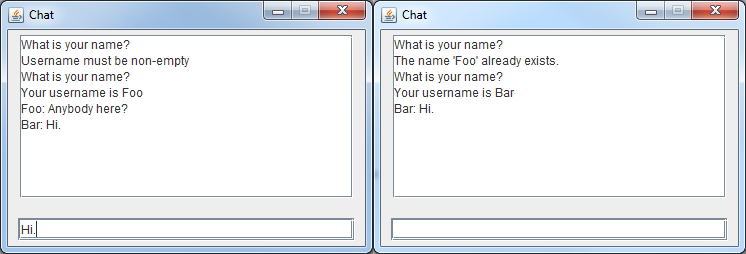
Below is an example interaction of two chat clients talking to each other. The first thing that happens is the server asks for a username from each client. The username must be non-empty and it cannot match any other existing user. Once a user enters a valid username, anything they type will be sent to all other clients who have entered a valid username. Notice that the client on the right (‘Bar’) does not receive the message send by the client on the left (‘Foo’) because he had not yet entered a valid username.
Reflection
Going into this little project I wasn’t really sure what to expect. I was a little surprised by how simple it was to use sockets, although it may just be Java’s way of hiding all the details from the programmer. Although I didn’t have any specific goals with this project I certainly feel like I accomplished something. I’m sure there’s a lot more subtleties and details to learn about sockets, but I think I now know enough to use sockets in something a little more complex. My next networking related goal will probably be to create a simple multiplayer game over a network.
If you are interested, the code for this project can be found on GitHub.